아이폰 OS 개발 자료 총정리
KT앱 대회 준비하면서 모은 자료들을 정리해서 올립니다.
거의 맥부기 카페 자료들이 대부분인데 한곳에 모아서 찾아보기 쉬우라고 올려봅니다.
-푸쉬 서버 개발 관련 자료-
이지 APNS 오픈 소스 라이브러리
http://www.easyapns.com/
구글 코드 APNS 오픈 소스
http://code.google.com/p/apns-php/
서버 튜토리얼
http://blog.boxedice.com/2009/07/10/how-to-build-an-apple-push-notification-provider-server-tutorial/
-label이나 textView에 현재 시간을 표시하고 싶습니다-
NSDate *t = [NSDate date];
NSDateFormatter *formatter = [[NSDateFormatter alloc] init];
NSString *timeStr = [formatter setDateFormat:@"HH:mm:ss"];
myLabel.text = timeStr;
...
[textView scrollRangeToVisible:NSMakeRange([textView.text length]-1, 1)];
-시뮬레이터 포토 라이브러리 자신의 이미지 추가 방법-
UIImage * sShot = [UIImage imageNamed:@"imageName.jpg"];
UIImageWriteToSavedPhotosAlbum(sShot, nil, nil, nil);
-네이게이션바 스타일 바꾸기-
http://cafe.naver.com/mcbugi/1241
-이미지 자르기 함수를 소개합니다. (UIImage)-
http://www.hive05.com/2008/11/crop-an-image-using-the-iphone-sdk/
-HTTP 라이브러리-
http://allseeing-i.com/ASIHTTPRequest/How-to-use
-json 관련-
라이브러리 http://code.google.com/p/json-framework/
json 투토리얼 http://iphonedevelopertips.com/networking/iphone-json-flickr-tutorial-part-1.html
-알럿 템플렛-
self.myAlertView = [ [UIAlertViewalloc]
initWithTitle:@"알림"
message:@"이메일을입력해주세요"
delegate:self
cancelButtonTitle:nil
otherButtonTitles:@"확인", nil];
self.myAlertView.delegate = self;
[self.myAlertViewshow];
-푸쉬서버 구현을 위한 서버 인증서 pem 만들기-
애플 개발자 센터 apps ID 추가 (이때 와일드카드(*)는 사용하면 안됨)
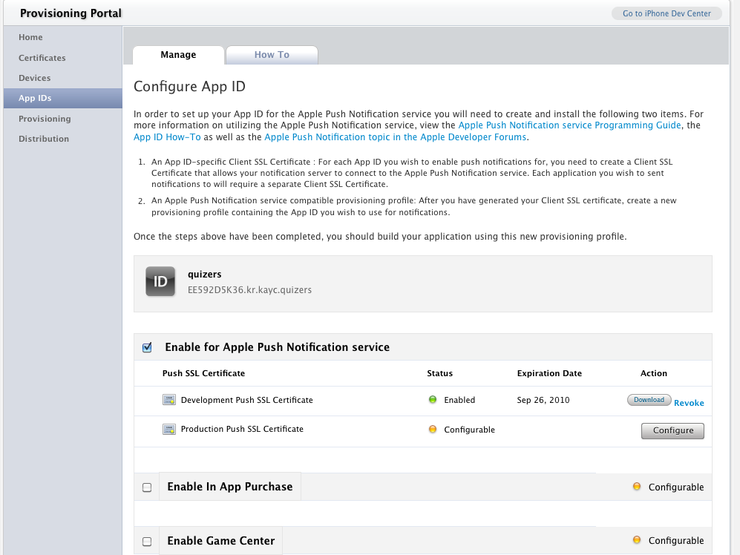
키체인에서 개인 인증서 하나 만들어 애플 개발 센터에 등록
애플 개발센터에서 cert파일을 다운받아서 키체인으로 추가
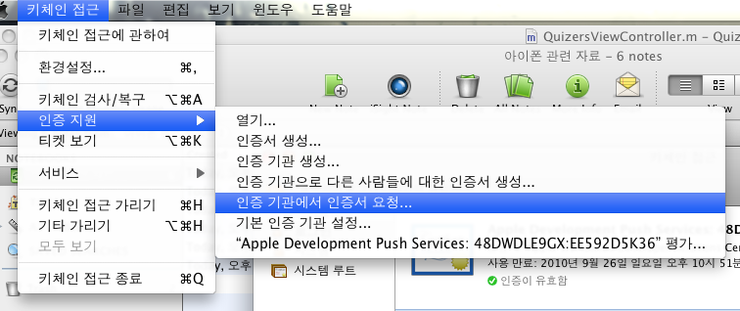
키체인에서 내보내기로 p12파일로 저장
커맨드에서 p12파일을 pem파일로 변환
openssl pkcs12 -in quizers_dev_cert.p12 -out quizers_dev_cert.pem -nodes -clcerts
-전역변수를 사용해 보자...-
http://cafe.naver.com/mcbugi/55643
-JSON 2중 뎁스 이상 키 접근하기-
NSDictionary*feed =[self downloadPublicJaikuFeed];
// get the array of "stream" from the feed and cast to NSArrayNSArray*streams =(NSArray*)[feed valueForKey:@"stream"];
// loop over all the stream objects and print their titlesint ndx;
NSDictionary*stream;
for(ndx =0; ndx < stream.count; ndx++){
NSDictionary*stream =(NSDictionary*)[streams objectAtIndex:ndx];
NSLog(@"This is the title of a stream: %@", [stream valueForKey:@"title"]);
}
-배열 NSArray-
초기 데이터로 생성
NSArray *array = [[NSArray alloc] initWithobjects:추가할 객체들.. , nil];
스트링으로 생성
NSArray *joins =(NSArray*)[result objectForKey:@"joins"];
길이 구하기
NSLog(@"Array size : %d " , sizeof(BUILDING_DATA) / sizeof(BUILDING_DATA[0]));
-(NSUInteger) UnicharLength:(const unichar*)str
{
unichar* pStr = (unichar*)str;
for( ; pStr[0] != nil ; pStr++ );
return (NSUInteger)(pStr - str);
}
[[NSString alloc] initWithCharacters:(원본문자열) length:[self UnicharLength:(원본문자열)]];
-랜덤 출력-
srandom(time(NULL));
value = random() % 100;
위처럼 하시면 0~99사이의 한수를 리턴합니다.
srandom(time(NULL)); 는 첨에 한번만 해주시면 됩니다.
-Code Sign error: Provisioning profile이 맞지 않을 때 변경 방법-
여러 장비에서 작업을 하거나 여러 프로젝트를 진행 중에 변경된 Provisioning profile이 적용되지 않아 Debug를 할 때 ”Code Sign error: Provisioning profile ‘3E6AA725-6534-46F8-B9CE-D19AC9FD854B’ can’t be found” 이런 오류가 발생하는 경우가 있는데요. 이럴 때 현재 사용중인 Provisioning Profiles로 프로젝트 세팅을 변경해주는 방법을 소개한 글(원문)이 있어서 공유합니다.
1. 실행중인 Xcode Project를 닫습니다.
2. Finder에서 프로젝트 폴더로 이동합니다.
3. 프로젝트 .xcodeproj 파일 선택하고 마우스 오르쪽 키를 눌러 '패키지 내용 보기'를 선택합니다.
4. 패키지 내용 보기를 통해 패키지 안에 있는 project.pbxproj 파일을 Xcode로 불러옵니다.
5. 검색을 통해 PROVISIONING_PROFILE 부분을 찾아 변경된 Provisioning profile 로 변경해줍니다.
6. 현재 Provisioning profile을 확인하려면 Organizer 창을 열어보면 알 수 있습니다.
7. Window > Organizer로 Organizer 창을 열고 왼쪽에 IPHONE DEVELOPMENT > Provisioning Profiles로 이동합니다.
8. 오른쪽에 있는 Profile Identifier를 복사해서 변경해주면됩니다.
9. 변경이 끝나면 project.pbxproj 저장하고 프로젝트를 열어 테스트합니다.
-아이폰 웹개발에서 디바이스 아이디 가져올수있나요?-
[[UIDevice currentDevice] uniqueIdentifier];
-Accessing Objects in a NSArray-
To access an object in an NSArray, you use the -objectAtIndex: method, as in the following example:NSArray *numbers;
NSString *string;
numbers = [NSArray arrayWithObjects: @"One", @"Two", @"Three",
nil];
string = [numbers objectAtIndex: 2]; // @"Three"
Of course, you have to be careful not to ask for an object at an index which is negative or bigger than the size of the array; if you do, an NSRangeException is raised (we'll learn more about exceptions in another tutorial).
To get the length of an array, you use the method -count, as in:
NSArray *numbers;
int i;
numbers = [NSArray arrayWithObjects: @"One", @"Two", @"Three",
nil];
i = [numbers count]; // 3
-상태바 제어-
안 보이게
[UIApplication sharedApplication].statusBarHidden = NO;
스타일
UIApplication *myApp = [UIApplication sharedApplication];
[myApp setStatusBarStyle:UIStatusBarStyleBlackOpaque];
-메모리 오버되어서 어플이 죽는 경우에 호출되는 이벤트??-
뷰컨트롤러 베이스로 작업을 한다면
- (void)didReceiveMemoryWarning
함수로 메모리가 위험할시에 위 함수를 핸들링하니 내부에 관련 대응할 처리를 구현해주면 됩니다.
-D-Day 구하기-
NSDate* date = [NSDatedateWithNaturalLanguageString:@"2010-06-30"];
NSDate* d_day = [NSDatedateWithNaturalLanguageString:@"2010-12-31"];
NSDateComponents *dcom = [[NSCalendar currentCalendar]components: NSDayCalendarUnit
fromDate:date
toDate:d_day
options:0];
NSLog(@"day=%d", [dcom day]); // 184
-라디오 버튼이나 체크박스등을 찾지를 못하고 있는데-
Interface Builder 에서 library를 보시면 segmented control, switch가 보일겁니다.
말씀하시는 라디오버튼이나 체크박스는 없지만
라디오버튼은 segmented control로 대체, 체크박스는 switch 로 대체하셔서 사용하시면 될듯합니다.
-책장 넘기기 효과-
UIView 를 하나 만들고 그 안에 UIImageView 를 만들었습니다.
이제 이미지뷰어의 내용을 채울때 책장을 넘기듯이 넘기는 방법입니다.
[UIView baginAnimations:@"stalker" context:nil]; <- stalker 는 UIView 의 이름입니다
[UIView setAnimationTransition:UIViewAnimationTransitionCurlUp forView:stalker cache:YES];
[UIView setAnimationDuration:1.0];
imageView.image = [UIImage imageNAmed:이미지파일명];
[UIView commitAnimations];
이 걸 터치 이벤트나 이런곳에 삽입하면
책장을 넘기듯이 이미지의 전환이 일어납니다.
-image를 fade out 효과-
[UIView beginAnimations:nil context:NULL];
[imageView setAlpha:0.0];
[UIView commitAnimations];
-UIView Animation 중복방지-
[UIView beginAnimations:nil context:nil];
[UIView setAnimationCurve:UIViewAnimationCurveLinear];
....
[UIView setAnimationDelegate:self];
[UIView setAnimationDidStopSelector:@selector(animationFinished:finished:context:)];
[UIView commitAnimations];
이런 식으로 에니메이션을 만들었는데 간단하게 UIImageView를 한점에서 다른 한점으로 이동시킵니다.
근데 그래서 에니매이션이 끝나면 다시 또다른 다른 두 좌표로 해서 위의 코드가 실행되서 계속해서 UIImageView를 움직이게 하고 있습니다.
근데 질문은 1. setAnimationDidStopSelector 에서 에니매이션이 끝난것을 알기전에 강제로 에니메이션을 멈출수 있나요?
2. 제 경우에는 어떤 경우에 위 코드가 setAnimationDidStopSelector 가 호출되었을때 만 실행되는 것이 아니라 다른 부분에서도 호출하기도 합니다. 근데 문제는 동시에 위 코드가 중복되어서 호출되면 이상하게 작동해요. 그래서 꼭 위 코드를 실행(에니매이션을 commit 하기전에는 반드시 에니메이션을 강제로 멈추던지 아니면 다른 체크를 해야 할것 같은데.....
혹시 방법이 있으면 부탁드립니다.
꾸벅~
답글 :
[UIView setAnimationsEnabled:NO];
// 에니메이션을 종료 합니다.
-일정시간 딜레이 후 함수 호출-
[self performSelector:@selector(playerStop) withObject:nil afterDelay :1.0f];
-(void) playerStop
{
}
-개발 완료, 베타 테스팅용 Ad Hoc 배포-
http://cafe.naver.com/mcbugi/9042
-테이블뷰에 원격이미지를 넣을경우 스크롤이 느려지는 현상-
LazyTableImages 샘플 http://developer.apple.com/iphone/library/samplecode/LazyTableImages/Introduction/Intro.html#//apple_ref/doc/uid/DTS40009394
AsyncImageView 클래스 http://www.markj.net/iphone-asynchronous-table-image/
-테이블 뷰 섹션별로 이름 주기-
- (NSString *)tableView:(UITableView *)tableView titleForHeaderInSection:(NSInteger)section {
if( section == 0 ) {
return@"발행한퀴즈";
} elseif( section == 1 ) {
return@"참여한퀴즈";
} else {
return@"진행중인퀴즈";
}
}
-정사각형으로 사진을 CROP 하고, 썸네일 크기에 맞게 리사이즈-
먼저, 출처는 다음 기사입니다.
http://tharindufit.wordpress.com/2010/04/19/how-to-create-iphone-photos-like-thumbs-in-an-iphone-app/
iPhone 사진앨범의 특징은 가로나 세로가 긴 이미지라 할지라도,
정사각형으로 사진을 CROP 하고, 썸네일 크기에 맞게 리사이즈 시킵니다.
위의 기사의 내용을 나름대로 보기 편하게(?) 수정을 했습니다.
함수명 - makeThumbnailImage
파라미터 - 원본 이미지, 리사이즈없이 CROP만 할지 여부, 리사이즈할 정사각형 한변의 길이
리턴값 - CROP 및 리사이즈된 이미지
- (UIImage*) makeThumbnailImage:(UIImage*)image onlyCrop:(BOOL)bOnlyCrop Size:(float)size
{
CGRect rcCrop;
if (image.size.width == image.size.height)
{
rcCrop = CGRectMake(0.0, 0.0, image.size.width, image.size.height);
}
else if (image.size.width > image.size.height)
{
int xGap = (image.size.width - image.size.height)/2;
rcCrop = CGRectMake(xGap, 0.0, image.size.height, image.size.height);
}
else
{
int yGap = (image.size.height - image.size.width)/2;
rcCrop = CGRectMake(0.0, yGap, image.size.width, image.size.width);
}
CGImageRef imageRef = CGImageCreateWithImageInRect([image CGImage], rcCrop);
UIImage* cropImage = [UIImage imageWithCGImage:imageRef];
CGImageRelease(imageRef);
if (bOnlyCrop) return cropImage;
NSData* dataCrop = UIImagePNGRepresentation(cropImage);
UIImage* imgResize = [[UIImage alloc] initWithData:dataCrop];
UIGraphicsBeginImageContext(CGSizeMake(size,size));
[imgResize drawInRect:CGRectMake(0.0f, 0.0f, size, size)];
UIImage* imgThumb = UIGraphicsGetImageFromCurrentImageContext();
UIGraphicsEndImageContext();
[imgResize release];
return imgThumb;
}
위 소스를 참고하시면, 이미지를 CROP 하는 방법이나, 이미지를 RESIZE 하는 방법을 참고하실수 있을겁니다.
사족을 붙이자면, 왜 Resize 할지 여부를 따로 분리 시킨 이유는 실제로 사용을 해보면 Resize 루틴에서
많은 CPU 부하가 걸립니다. 그래서 UIImageView 에 contentMode를 UIViewContentModeScaleAspectFit 로 설정해서
자체적으로 리사이즈를 하게 하는 방법이 비동기적으로 괜찮습니다. (물론.. 실제 Resize된 이미지가 아니므로 메모리적인 소비는 있습니다.)
많은 도움 되셨으면 좋겠네요 ^^
-사진찍을때 아래에서 올라오는 메뉴 UIActionSheet-
http://ykyuen.wordpress.com/2010/04/14/iphone-uiactionsheet-example/
-uibutton disable-
http://www.iphonedevsdk.com/forum/iphone-sdk-development/2499-uibutton-disable.html
-이미지 슬라이드 샘플-
http://lievendekeyser.net/index.php?module=messagebox&action=message&msg_id=1351
-커버플로우 라이브러리-
http://apparentlogic.com/openflow/
-Xcode3.2.3과 SDK4로 업그레이드 후, 기존 앱 업그레이드 하는 법-
XCode3.2.3 과 SDK4로 버전업한 후, 기존 앱을 업그레이드 할 때 간단한 Tip 입니다.
1. XCode3.2.3과 SDK4로 업그레이드 한다. 별도로 기존 XCode 3.1 버전을 따로 보관할 필요가 없습니다.
2. 기존 앱을 새 XCode3.2.3에서 연다.
3.Group & Files를 right click -> Get Info 후
3-1.General Tab 에서
Project Format 을 Xcode 3.2-compatible 로 바꾼다.
3-2.Build Tab 에서
Base SDK를 iPhone Device 4.0(배포시), 혹은 iPhone Simulator 4.0(테스트시) 로 바꾼다
iPhone OS Deployment Target 을 iPhone OS 3.0 (즉 지원하고자 하는 하위버전으로) 로 바꾼다.
이렇게 하시면 됩니다.
-객체 타입 비교-
if ( [a isKindOfClass:b] )
-문자열 비교-
NSString *strText = idField.text;
if([srText isEqualToString:@"mihr01"])
....
else if([srText isEqualToString:@"mihr02"])
....
else
...
이렇게 하셔도 되고요 완전 같은 스트링이 아니라
포함된것을 찾으려면
if([strText rangeOfString:@"mihr01"].length)
-탭뷰에 스타일시트를 붙일때-
UIActionSheet *popupQuery = [[UIActionSheetalloc]
initWithTitle:nildelegate:self
cancelButtonTitle:@"취소"
destructiveButtonTitle:nil
otherButtonTitles:@"사진찍기", @"기존의사진선택", nil];
popupQuery.actionSheetStyle = UIActionSheetStyleBlackOpaque;
QuizersAppDelegate *appDelegate = (QuizersAppDelegate *)[[UIApplicationsharedApplication] delegate];
[popupQuery showInView:appDelegate.window];
-스크롤 밀어서 데이터 리플래쉬 하기-
소스코드
http://github.com/facebook/three20/tree/master/samples/TTTwitter/
설명
http://www.drobnik.com/touch/2009/12/how-to-make-a-pull-to-reload-tableview-just-like-tweetie-2/
-테이블뷰 위에 검색창 붙이는 방법-
테이블뷰 위에 검색창 넣으신 후에, viewDidLoad 메서드 부분에 [table setContentOffset:CGPointMake(0.0, 44.0) animated:NO];해주시면 처음 보여질 때는 검색창이 안 보이다가 밑으로 땡기면 나타나게 됩니다.
-네트워크 연결 됐는지 확인 Reachability-
http://www.raddonline.com/blogs/geek-journal/iphone-sdk-testing-network-reachability/
http://theeye.pe.kr/entry/how-to-check-network-connection-on-iphone-sdk
-아이폰 강제종료 버튼 이벤트-
아래 메소드가 어플이 종료될 때 수행되는 함수입니다.
종료될 때에 각종 리소스들을 Free시킬 경우에 사용됩니다.
참고하시면 될 듯 합니다~
- (void)applicationWillTerminate:(UIApplication *)application
-크랙 방지 클래스-
http://cafe.naver.com/mcbugi/11661
-어플을 강제 종료하는 API 는 아이폰에서 제공하지 않는다?-
http://cafe.naver.com/mcbugi/11803
-탭바 클릭시 바로 UISearchBar 클릭되도록 할려면 어떻게 해야 하나요?-
UISearchBar가 first responder가 되게 하면 됩니다.
-UITextField 입력값 체크하기 : 문자열 길이, 숫자여부 체크-
헤더(.h)에 UITextFieldDelegate 선언
@interface 클 래스명 : UIViewController <UITextFieldDelegate>
구현부(.m)에 다음 메쏘드를 구현하면 됨
- (BOOL)textField:(UITextField *)textField shouldChangeCharactersInRange:(NSRange)range replacementString:(NSString *)string {
//return NO하면 입력이 취소됨
//return YES하면 입력이 허락됨
//textField 이용해서 어느 텍스트필드인지 구분 가능
//최대길이
int maxLength = 128;
NSString *candidateString;
NSNumber *candidateNumber;
//입력 들어온 값을 담아둔다
candidateString = [textField.text stringByReplacingCharactersInRange:rangewithString:string];
if(textField == IDField) {
maxLength = 8;
} else if(textField == AgeField) {
//숫자여부 점검
//length가 0보다 클 경우만 체크//0인 경우는 백스페이스의 경우이므로 체크하지 않아야 한다if ([string length] > 0) {
//numberFormatter는 자주 사용할 예정이므로 아래 코드를 이용해서 생성해둬야함
//numberFormatter = [[NSNumberFormatter alloc] init];
//[numberFormatter setNumberStyle:NSNumberFormatterDecimalStyle];
//numberFormatter 를 이용해서 NSNumber로 변환
candidateNumber = [numberFormatter numberFromString:candidateString];
//nil이면 숫자가 아니므로 NO 리턴해서 입력취소
if(candidateNumber == nil) {
return NO;
}
//원 래 문자열과 숫자로 변환한 후의 값이 문자열 비교시 다르면
//숫자가 아닌 부분이 섞여있다는 의미임
if ([[candidateNumber stringValue] compare:candidateString] != NSOrderedSame) {
return NO;
}
maxLength = 2;
}
}
//길이 초과 점검
if ([candidateString length] > maxLength) {
return NO;
}
return YES;
}
http://cafe.naver.com/mcbugi/37651-How to split string into substrings on iPhone?-
http://stackoverflow.com/questions/594076/how-to-split-string-into-substrings-on-iphone
-메모리 누수-
http://cafe.naver.com/mcbugi/64257
-디바이스 가로 세로 상태-
UIDeviceOrientationIsLandscape([UIDevicecurrentDevice].orientation) ?
-UITextField 에 자동 포커스 주기-
키보드 올리면서 커서를 넣을때는 아래방법을 이용하시면 됩니다.
[textField becomeFirstResponder];
참고로 이건 커서를 빼면서 키보드를 내리실때 사용하시면 되구요...
[textField resignFirstResponder];
-홈버튼이 눌렸을 때도 텍스트뷰 내용을 저장하려면 어떻게 해야할까요?-
- (void)applicationWillTerminate:(UIApplication *)application / Application Delegate 메서드 부분에 구현하시면 되지않을가요?
-3.2 4.0 동영상 플레이-
http://iphonedevelopertips.com/video/getting-mpmovieplayercontroller-to-cooperate-with-ios4-3-2-ipad-and-earlier-versions-of-iphone-sdk.html
-한글완성형(EUC-KR)을 iPhone/Mac에서 사용할 수 있는 언어셋으로 변환하기-
http://blog.backpackholic.tv/160
-인터페이스 함수들을 편하게 가져오는 방법-
http://code.google.com/p/xcode-auto-assistant/
-#pragma mark로 코드 쉽게 구분하기-
http://cafe.naver.com/mcbugi/64408
-os4에서 applicationWillTerminate가 안먹어서 알게된것-
os4에서 applicationWillTerminate: 가 안먹어서 삽질하다가 알아낸 결과입니다.
뒷북 인지는 모르지만 혹시 모르시는 분을 위해서 적어봅니다.
os3.x 에서는 홈버튼을 한번만 누르면 applicationWillTerminate 가 아주 잘 호출됩니다.
하지만 os4 에서는 홈버튼을 한번만 누르면 applicationDidEnterBackground 가 호출됩니다.
os4 에서 멀티태스킹을 위해서 좀 바뀌었습니다.
os4에서도 홈버튼 한번 누를때 applicationWillTerminate 가 호출되게 하려면
info.plist 에서 'Application does not run in background' 이 속성을 추가해주면 됩니다.
위 속성이 없으면 기본적으로 멀티태스킹이 되는걸로 간주합니다. (진짜 멀티태스킹은 아니지만)
위 속성이 없을때 호출되는 메소드를 실험해 봤습니다.
-----------------------------------------------------------------
처음 어플을 실행시키면
didFinishLaunchingWithOptions, applicationDidBecomeActive
이 호출되고
홈버 튼을 한번 만 누르면
applicationWillResignActive, applicationDidEnterBackground
호출되면서 어플이 종료되고
이상태에서 다시 어플을 실행시키면
applicationWillEnterForeground, applicationDidBecomeActive
호출됩니다.
홈버튼을 두번 누르면
applicationWillResignActive
이 호출됩니다.
----------------------------------------------------------------
'Application does not run in background' 을 체크하면
홈버 튼을 한번만 누르면 applicationWillTerminate 를 호출합니다.
'근데 속성 체크 안했을때 applicationWillTerminate 는 호출이 안되는건지 궁금하네요.
아시는 분 좀 알려주세요.
답글 : Applicationwillterminate함수 대신에 applicationDidENterBAckground 사용하라고하네여 이곳에서 공유자원해제나 사용자데이타 저장,타이머 무효화,어플상태정보등 저장을 하라고 합니다. http://cafe.naver.com/mcbugi/65497
-COCOS2D 번개 효과-
http://www.cocos2d-iphone.org/forum/topic/370
-iPhone 4.0 호환 키보드에 버튼 or 뷰 붙이기-
기존꺼에 비해 약간 수정되 었을뿐입니다....
하지만 -_-이거 찾느라 ㅠㅠ;;
3.1.x에서는 windows 서브뷰에 항상 키보드 뷰가 있었지만 ...
4.0 부터는 windows 에 항상 있는게 아니고, 키보드를 불렀을때 -_- 붙어서 오더라고요.. 그래서
Done 버튼 붙이는 예제 입니다. (Number 패드에)
아래 액션을 Text필드의 BeginTouched 에 연결 시킵니다.
// 키보드가 나왔을때랑 사라질때의 이벤트를 잡아냅니다.
//3.1.X 에서는 UIKeyboardWillShowNotification 으로 잡지만
// 4.0 때문에 --; DidShow로 잡아줬습니다.
//그래야 윈도우에 키보드가 있더라고요 ;;;
-(IBAction)FieldTouched{
[[NSNotificationCenter defaultCenter] addObserver:self
selector:@selector(keyboardWillShow:)
name:UIKeyboardDidShowNotification
object:nil];
[[NSNotificationCenter defaultCenter] addObserver:self
selector:@selector(keyboardWillHide:)
name:UIKeyboardWillHideNotification
object:nil];
}
// 키보드가 나왔을때 Done 버튼 붙여주기
- (void)keyboardWillShow:(NSNotification *)note {
UIButton *doneButton = [UIButton buttonWithType:UIButtonTypeCustom];
doneButton.frame = CGRectMake(0, 163, 106, 53);
doneButton.adjustsImageWhenHighlighted = NO;
[doneButton setImage:[UIImage imageNamed:@"DoneUp.png"] forState:UIControlStateNormal];
[doneButton setImage:[UIImage imageNamed:@"DoneDown.png"] forState:UIControlStateHighlighted];
[doneButton addTarget:self action:@selector(backgroundTap:) forControlEvents:UIControlEventTouchUpInside];
//3.1.x 와 4.0 호환 키보드 붙이기
for( UIWindow *keyboardWindow in [[UIApplication sharedApplication] windows] ){
for( UIView *keyboard in [keyboardWindow subviews] ){
NSString *desc = [keyboard description];
if( [desc hasPrefix:@"<UIKeyboard"]==YES ||
[desc hasPrefix:@"<UIPeripheralHostView"] == YES ||
[desc hasPrefix:@"<UISnap"] == YES )
{
[keyboard addSubview:doneButton];
}
}
}
}
// 키보드가 없어질때 Done 버튼을 삭제 합니다.
- (void)keyboardWillHide:(NSNotification *)note {
for( UIWindow *keyboardWindow in [[UIApplication sharedApplication] windows] ){
for( UIView *keyboard in [keyboardWindow subviews] ){
NSString *desc = [keyboard description];
if( [desc hasPrefix:@"<UIKeyboard"]==YES ||
[desc hasPrefix:@"<UIPeripheralHostView"] == YES ||
[desc hasPrefix:@"<UISnap"] == YES )
{
for(UIView *subview in [keyboard subviews])
{
[subview removeFromSuperview];
}
}
}
}
}
도 움 되시길 바랍니다 ;)
http://cafe.naver.com/mcbugi/62349
-배열내 숫자 값 비교해서 정렬하기-
쓰시면 됩니다.
NSObject {
(nonatomic, retain) NSString *name;
distance;
-[TIP] 시뮬레이터 사진앨범에 사진넣기-
1) 시뮬레이터를 실행시킵니다.
2) 맥에서 포토라이브러리에 넣을 사진을 시뮬레이터로 Drag&Drop 합니다.
3) 그러면, 사파리가 열리면서 Drag한 이미지가 표시가 될겁니다.
4) 그 표시된 이미지를 마우스로 꾸~~~~~~욱 눌러줍니다.
5) 그러면, 메뉴가 뜨면서 이미지를 저장할건지 복사할건지를 묻습니다.
6) 이미지 저장을 누릅니다.
7) 이제 시뮬레이터의 사진앨범에 가 보시면 아까 저장한 사진이 들어가있을겁니다.
'컴퓨터 > 아이폰' 카테고리의 다른 글
| UINavigateionController을 잘 정리해놓은 자료 (0) | 2011.08.03 |
|---|---|
| ios 버전 체크 (0) | 2011.07.17 |
| 아이폰 다음버전 출시설..ㅋ (0) | 2011.06.24 |
| UIWebView와 Application(App) 간의 통신 (0) | 2011.06.24 |
| push notification (0) | 2011.06.24 |


